[TOC]
核心语法
# 1.OptionsAPI(选项式)和 CompositionAPI(组合式)选项式 API:data,methods,name 等 Vue2 的基础写法
弊端:数据方法计算属性分别在不同的 api 中不便于维护和复用组合式 API?
2.setup
原来数据是写在 data 里面的现在这样的写法不是响应式 的
而且 setup 会比 beforeCreate 要响应的更早, setup return 也可以是一个函数
1
2
3
4
5
6
7
8
9
10
11
12
13
14
15
16
17
return ()=>'hellow' export default { name: 'person', setup() { let name = '张三'//此时的name不是响应式的 let age = 20/此时的age不是响应式的 let tel = '11111111'/此时的tel不是响应式的 function showTel() { alert(tel) } return { name, age, tel, showTel } }
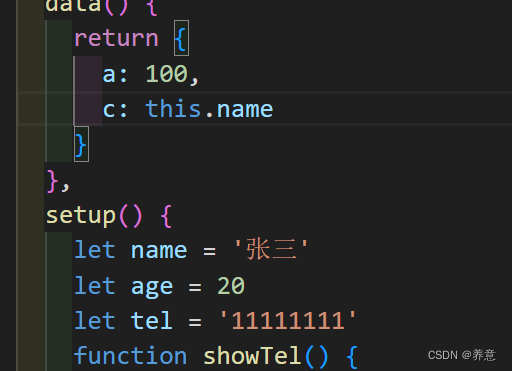
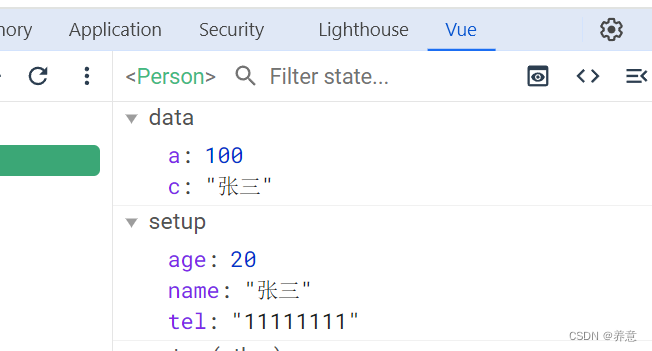
setup 与 data,methods 同时存在
data 能不能拿到 setup 中的值呢?可以拿到!
setup 是生命周期里面最早的
setup 能拿到 data 里面的值么?不能
# setup 语法糖
1
2
3
4
5
6
7
<script setup> 相当于在setup函数里面写,而且不用自己return <script>
但是呢语法糖里不能写组件名称相关的,这时候需要用到一个插件
1 npm i vite-plugin-vue-setup-extend
在 vite.config.ts 中配置即可
1
2
3
4
5
6
7
import VueSetup from 'vite-plugin-vue-setup-extend' export default defineConfig ({ plugins : [ vue (), VueSetup () ],
1
2
3
4
5
6
7
8
9
10
11
12
13
14
<script lang="ts" > export default { name : 'person' , } </script> <script setup lang ="ts" > let name = '张三' let age = 20 let tel = '11111' let a = 101 function showTel ( alert (tel) } </script >
不想写两个标签可以直接在 script 标签上使用 name 属性自定义,如果与文件名同名不用插件也可以
# ref 响应式数据基本类型的响应式数据
引入
1 2 import { ref } from 'vue'
想让什么数据是响应式的就用 ref 包住
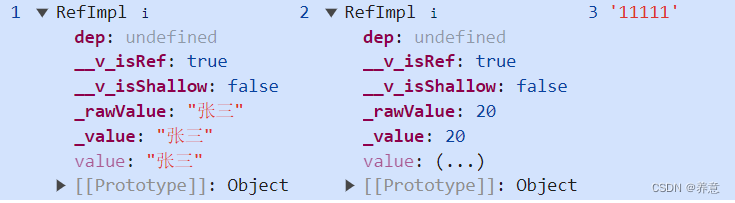
1
2
3
4
5
let name = ref ('张三' )let age = ref (20 )let tel = '11111' let a = 101 console .log (1 , name, 2 , age, 3 , tel)
看看区别
而且插值上会自动.value 不用写,但是修改值的时候需要使用.value 修改
1
2
3
4
5
6
7
} function changeName () { name.value = '大哥' } function addAge () { age.value++ }
# reactive 只能定义 object 的响应式数据()
1
2
3
4
5
6
7
8
9
10
11
import { reactive } from 'vue' let name = ref ('张三' )let age = ref (20 ) let hobby = reactive ({ name : '章子怡' , age : 45 , sex : '男' })
ref 可以定义基本类型的响应式数据,也可以定义对象类型的响应式数据
ref 的底层还是 reactive
区别:
1.ref 创建的变量必须使用.value 可以使用 volar 自动添加.value
2.reactive 重新定义一个对象 hobby 的时候,这个对象就失去了响应式属性
hobby={name:'',age:''.......},
可以使用 Object.assign (a,b) a 和 b 的都会对比不一样就新建,一样就替换
1
2
3
4
5
6
7
8
9
10
let assign = { name : 'ls' , age : 12 , sex : '5' }let tel = '11111' let a = 101 console .log (hobby)function changeC (hobby={ name : 'ls' , age : 12 , sex : '5' } Object .assign (hobby, assign) hobby.value ={ name : 'ls' , age : 12 , sex : '5' } console .log (hobby) }
# toRefs 解构确保结构出来的对象都是响应式对象
通过把 reactive 中每一组键值提出来成一个新的对象
解构后页面也可以直接使用 name
1
2
3
4
5
6
7
8
let person = reactive ({ name : '章子怡' , age : 45 })let { name, age } = toRefs (person)function changeName ( name.value += '冯刚' } function changeAge ( age.value += 1 }
# 计算属性 computed只读的计算属性,fullName 不能修改
1
2
3
4
let fullName = computed (() => { const name = na.value .slice (0 , 1 ).toUpperCase () + na.value .slice (1 ) + me.value return name })
v-model 修改后发现是只读,也就是没有 set , 怎么改成可读可写呢?写 get,set 函数
1
2
3
4
5
6
7
8
let fullName = computed (() => { get (val ){ return name+'zha' } set (val ){ name.value =val } })
# watch 侦听vue3 中 watch 可以监视的数据只有四种
# 1.ref 定义的数据基本类型
1
2
3
4
5
6
watch (na, (newV, oldV ) => { console .log (newV, oldV) }) watch (me, (newV, oldV ) => { console .log (newV, oldV) })
对象类型
1
2
3
4
5
6
7
8
watch ( hud, (newV, oldV ) => { console .log (newV, oldV) }, { deep : true ,immediate :true } )
总结:如果是修改的整个对象那就有新旧值之分,修改的是对象里面的某个属性那新的和旧的都是一样的
# 2.reactive 定义的对象如果监视的是 reactive 类型的对象数据已经隐式创建了深层监听,而且关不掉
因为修改姓名和 age 都是在原对象上操作原对象并没发生改变所以 newval 和 oldval 是一样的
1
2
3
4
5
6
7
8
9
10
watch (obj, (n, o ) => { console .log ('obj' , n, o) }) let obj = reactive ({ a : { b : { c : 100 } } })
修改整个对象后才分新旧值
1
2
3
function changePerson ( Object .assign (hud, { name : '终南山' , age : 68 }) }
# 3.getter 函数(能返回一个值的函数)只想让监视对象中的某个属性
1
2
3
4
5
6
7
8
9
10
11
12
13
14
15
let person = reactive ({ name : '张宝果' , age : 18 , car : { c1 : '奔奔' , b1 : '江淮' , a1 : '解放' } }) watch ( () => person.name , (n, o ) => { console .log ('person' , n, o) } )
监视对象里面的对象的时候可以直接写对象但是修改对象整个的时候不会被监听到
1
2
3
watch (person.car , (n, o ) => { console .log ('person' , n, o) })
加上函数后就会被监听到,但是里面的属性就监听不到了
1
2
3
4
5
6
watch ( () => person.car , (n, o ) => { console .log ('person' , n, o) } )
总:1. 监视对象中基本类型的数据的时候需要写成函数式
2. 监视对象中对象类型的数据时,不需要监听整个对象变化时可以直接写 ,需要监听整个对象不监听对象里面的变化时可以写成函数式,既需要监听整个对象变化,又要监听对象中属性的变化是时不仅要写成函数式,还要加 deep:true;
推荐使用函数式
4. 一个包含上述内容的数组
监视对象中指定的多个值
1 2 3 4 5 6 7 8 9 watch ( [() => person.car .a1 , () => person.name ], (n, o ) => { console .log ('person' , n, o) }, { deep : true } )
# WatchEffect用到谁就监视谁,加载自动执行一次
1 2 3 4 5 6 7 8 9 10 11 watchEffect (() => { if (sum.value >= 60 ) { console .log ('水温过高' ) } })
# 标签的 Ref 属性在 html 标签上就是获取 DOM 元素
1
2
3
4
5
6
7
8
9
10
11
12
13
14
15
16
<template> <div class ="person" > <button class ="btn" @click ="aler" > </button > <h2 ref ="cl" > 123</h2 > </div > </template> <script setup lang ="ts" name ="person" > import { ref } from 'vue' let cl = ref ()function aler ( console .log (cl.value ) cl.value .innerText = '128' } </script >
# 组件上的 ref 就是获取组件实例
打印时获取到的发现获取不到身上的值,还需要一个属性 defineExpose 来允许被访问
1 defineExpose ({ cl1, cl2, cl3 })
# TS 接口,泛型,自定义类
1 2 3 4 5 6 7 8 9 10 11 12 13 14 export interface PersonInter { id : string, name : string, age : number } export type Persons = Array <PersonInter >export type PersonList = PersonInter []-------------------------------------- import { type PersonInter , type Persons , type PersonList } from '../types/index' let personsList : PersonList = [{ id : 'ssdsdadsadas' , name : '132' , age : 68 }, { id : 'ssdsdadsadas' , name : '132' , age : 68 }, { id : 'ssdsdadsadas' , name : '132' , age : 68 }]
# Props 传值props 传值就子组件接收发生改变
1
2
3
4
5
6
7
8
9
10
11
12
13
14
import { [defineProps],withDefault } from 'vue' ..只接收值 defineProps (['list' ])defineProps<{ list : PersonList }>() defineProps<{ list?: PersonList }>() withDefault (defineProps<{ list?: PersonList }>(),{ list :()=> [{id :'sssss' ,name :'tsc' ,age :20 }]}) []代表可以省略
# Vue3 生命周期创建
beforeCreate,Created 被 vue3 里面的 setup 替代了
挂载
1
2
3
4
5
6
7
8
import {onBeforeMount}cl (创建)onBeforeMount (()=> {cl (挂载前)}) onMounted (()=> {cl (挂载完)})
更新
1
2
3
4
5
6
7
8
9
onBeforeUpdate,onUpdated onBeforeUpdate(()=>{ cl(更新前) }) onUpdated(()=>{ cl(更新完) })
卸载(vue2 销毁)
1
2
3
4
5
6
7
8
9
10
11
12
onBeforeUnMount (vue2beforeDestory) onUnmounted (vue2Destoryed) onBeforeUnMount (() cl (卸载前) }) onUnMounted (() cl (卸载完毕) })
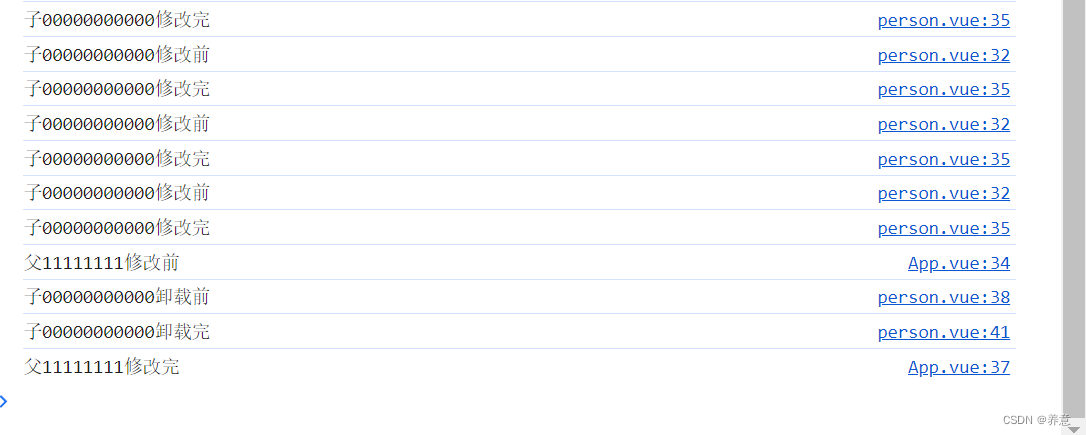
父子执行顺序,修改顺序
# Hook s把数据和方法分类整理成一个模块
里面可以写所有在组件中用到的方法属性
1
2
3
4
5
6
7
8
9
10
11
12
13
14
15
16
17
import { ref } from 'vue' export default function ( let sum = ref (0 ) function add ( sum.value += 1 } return { add, sum } } ------------------------------------------------------------------------------------------- import useSum from '../Hooks/useSum' import useDog from '../Hooks/useDog' let { dogList, getNewdog } = useDog ()let { sum, add } = useSum ()console .log (useDog ())
# Router一般由程序员亲自写标签的为一般组件
一般组件一般放在 components 里面
靠路由规则渲染的是路由组件
路由组件一般放在 pages 或 views 文件夹里面
路由工作模式
不带 #更美观但是缺点是项目上线需要服务端(houduan)配合处理路径问题否则会找不到 404
vue2:mode:history
vue3history:createWebHistory()
hash:hisrory:createWebHashHistory () 带有 #不美观不利于 seo
to 的写法
2. 对象
1 router-link :to="{path:'/about'}"
# 命名路由
1
2
3
4
5
{ name :'zhuye' path : '/home' , component : Home , }, <router-link :to ="{name:'/zhuye'}" active-class ="zhuzhuxia" > 首页</router-link >
# 嵌套路由# query传值(基础方法)
父 :发送 子:接受
传值(对象)
1
2
3
4
5
6
7
8
9
10
11
<router-link :to="{ path: '/news/content',或者用name:content query: { id: item.id, title: item.title, content: item.content } }" >{{ item.title }} </router-link>
# params(接受的地方 query 换成 params 就可以了)匹配路由规则:content? 传不传都不会报错
1
2
3
path : '/news' , component : News , children : [{ name : 'content' , path : 'content/:id/:title/:content?' , component : content
传参(基本)
1
2
3
4
<router-link :to="`/news/content/${item.id}/${item.title}/${item.content}`" >{{ item.title }} </router-link>
传参(简单)
1
2
3
4
5
6
7
<router-link :to="{ name: 'content', params: { id: item.id, title: item.title, content: item.content } }" >{{ item.title }} </router-link>
解构的话需要引入 ref 或者 reactive
# 路由 props 配置# props:true 开启路由传参(params)
1 children : [{ name : 'content' , path : 'content/:id/:title/:content' , component : content, props : true }
接收
1 defineProps (['id' , 'title' , 'content' ])
# props(query) 路由配置
1
2
3
4
5
6
7
8
9
10
children : [ { name : 'content' , path : 'content/:id/:title/:content' , component : content, props (route ){ return route.query } }]
接收
1 defineProps (['id' , 'title' , 'content' ])
拓展:对象(传固定的参数,不建议)
在 router-link 上加 replace 就是这个模式了,路由记录会直接覆盖上一条路由记录,而默认 push 会一直插入到最前面记录不会覆盖
到上面的位置后
继续点 push 的路由
# 编程式路由导航 (脱离 router-link 实现路由跳转)引入
1 import { useRouter } from 'vue-router'
使用(传值和正常的 router-link 里面的传值格式一样)
1 2 3 4 5 6 7 8 9 10 11 et router = useRouter () interface NewsInter { id : string title : string content : string } function jump (item: NewsInter ) { router.replace ({ name : 'content' , params : { id : item.id , title : item.title , content : item.content } })
# 路由重定向 redirect
1 2 3 4 { path : '/' , redirect : '/home' }
# Pinia 集中式状态管理工具vue2(vuex)
引入
1 2 3 npm i pinia import {createPinia} from 'pinia'
注册
1 2 3 const pinia=createPinia () app.use (pinia)
创建 store 文件夹,把不同组件的数据创建不同的模块
1 2 3 4 5 6 7 8 9 10 11 12 13 14 15 import { defineStore } from 'pinia' state函数里用来存放数据 export const useListStore = defineStore ('talk' , { state () { return { talkList : [ { id : '23132' , content : '你今天有点怪啊,怪恶心的' }, { id : '27732' , content : '草莓,蓝莓,蔓越莓,遇见你我最倒霉' }, { id : '5654654' , content : '给你留了一块地,风水宝地' }] } }, })
页面直接引入解构即可
1 2 import { useListStore } from '../store/bilins' const { talkList } = useListStore ()
交互(set)修改里面的值
1. 直接拿到值就修改
1 countStore.sum = s.value + o.value
2. 用于批量修改数据
1 countStore.$patch({ sum : s.value - o.value })
3. 使用 actions 修改数据
在 count 的 store 里面定义 action 可以对数据进行约束
1 2 3 4 5 6 7 8 9 actions : { increment (a, b ) { if (b!=0 ){ this .sum = a / b } } },
在组件中修改,直接调用方法名传参过来
1 countStore.increment (s.value , o.value )
# storeToRefs因为
所以简化
1 2 let countStore = useCountStore ()let { sum } = countStore
发现简化后不能修改
发现他把所有的属性都变成响应式的了,—_-
幸好 pinia 封装了一个好用的可以识别哪些是需要响应式属性哪些不需要的 storeToRefs,
就不打开对比了,一眼就看出来了 - 真不错
storeToRefs 只会处理数据不会处理方法
1 2 3 4 5 import { storeToRefs } from 'pinia' let countStore = useCountStore ()let { sum } = storeToRefs (countStore)
# getters 对数据进行进一步的计算可以写成函数式,这里的 state 形参和 this 的效果是一样的不想用函数式,也可以写成箭头函数更加简洁
1 2 3 4 5 6 7 8 9 10 11 12 state ( return { sum : 5 } }, getters : { maxSum (state ) { return state.sum * 100 } }
也可以写成箭头函数,
1 maxSum : state =>sum * 100
接收的话直接在接收的时候解构函数就可以了
1 let { sum,maxSum } = storeToRefs (countStore)
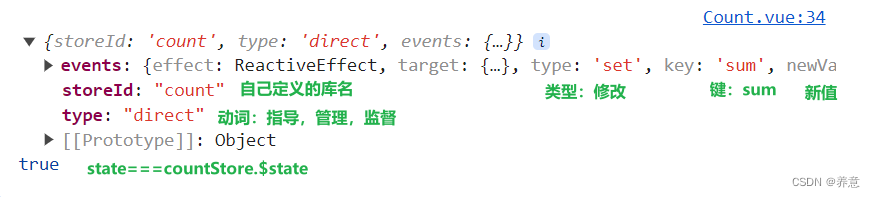
# $subscribemutate 本次修改的信息
state 就是库里面的 state
1 2 3 countStore.$subscribe((mutate, state ) => { console .log (mutate, state) })
可以让页面刷新不丢失数据
1 2 3 4 countStore.$subscribe((mutate, state ) => { console .log (mutate, state === countStore.$state ) localStorage .setItem ('sum' , JSON .stringify (sum.value )) })
配置参数
1 2 3 4 5 6 state ( return { sum : JSON .parse (localStorage .getItem ('sum' ) || '0' ) } },
刷新不丢失数据
# 选项式写法
组合式写法
我真的崩溃,这个 ref 设置的响应式对象一定要使用.value 取值赋值,找了半天以为是 ts 类型的错误,向外暴露用 {} 暴露
1 2 3 4 5 6 7 8 9 10 11 12 import { ref } from 'vue' export const useCountStore = defineStore ('count' , () => { let sum = ref (JSON .parse (localStorage .getItem ('sum' ) || '0' )) function increment (a: number, b: number ) { sum.value = a / b } const maxSum = (value * 100 return { sum, increment, maxSum } })
组件通信 Props
# Props 传值props 传值就子 **** 组件接收发生改变(父传子)
# 子传父父
1 2 3 传一个方法给儿子形参就是接受的值 <子组件 :sendAtm='父组件定义的方法名' />
子组件
1 2 3 4 5 6 7 8 9 10 11 12 13 14 defineProps (['sendAtm' ]) let atm=ref (100 ) btn @click='sendAtm(atm)' 或者方法二 const props=defineProps (['sendAtm' ])function send (atm ){props.sendAtm (atm) }
# 自定义事件父组件声明接收子组件的自定义事件
命名多个单词推荐使用 new-Toys 命名,或者小驼峰
1 2 3 4 5 6 7 8 <h1>好大二{{ son }}</h1> <Count @enter ="toys" /> let son = ref ('' )function toys (value: string ) { son.value = value console .log ('父组件接收到值' , value) }
子组件接收来自父组件的自定义事件并且设置触发按钮
1 2 3 4 5 6 7 8 9 10 11 let toy = ref ('奥特曼' ) const emit = defineEmits (['enter' ] ) <button @click="emit('enter', toy)" >发送数据给父组件</button> 或者触发事件funtion onEnte (){ emit ('enter' ,toy.value) }
# Mitt 任意组件通信 (约等于 pubsub,$bus)下载插件
创建 tools 文件夹,并创建 tools/emitter.ts 引入 mitt
1 2 3 import mitt from 'mitt' const emmitter=mitt ()
定义方法 on ()
1 2 3 4 5 6 emmitter.on ('test' , () => { console .log ('8848' ); }) emmitter.on ('test2' , () => { console .log ('8849' ); })
使用 emit ()
1 2 3 4 import emmitter from './tools/emitter' import { ref, onMounted } from 'vue' onMounted (() => { emmitter.emit ('test' )
单个解绑 off ()
全部解绑 clear ()
传值
发送组件里面
1 2 3 emmitter.emit ('send-atm' , toy) 触发事件名,发送的数据
接收 emmitter.on (触发事件名,回调函数(穿过来的值))
1 2 3 4 emmitter.on ('send-atm' , (value: any ) => { console .log (123 ) son.value = value })
组件卸载时在事件定义的组件上要卸载解绑该事件
1 2 3 onUnmounted(() => emmitter.off ('send-atm' ) })
# v-model 组件传值、父子双向数据绑定绑定原理
1 2 3 4 input v-model='username' input :value='username' @input='username=$event.target.value'
1 2 3 4 5 <son v-model='username' /> 原理就是 <son :modelValue='username' 把数据送过去组件上就多了一个是事件 @update :modelValue='username=$event'
但是子组件上需要事件去触发更改
1 2 3 4 5 defineProps (['modelValue' ]) const emit=defineEmits (['update:modelValue' ,'update:mima' ])
给子组件里面的 input 绑定触发事件,emit ('update:modelValue', 要传的值)
1 input :value='modelValue' @input='emit(' update :modelValue',$event.target.value)'
TIp: 在原生 DOM 上 $event 就是 DOM 事件对象,在组件标签上就是触发事件时传过来的值
也可以在 v-model: 自定义名称 ='username' 事件触发(update: 自定义名称,要传的值)
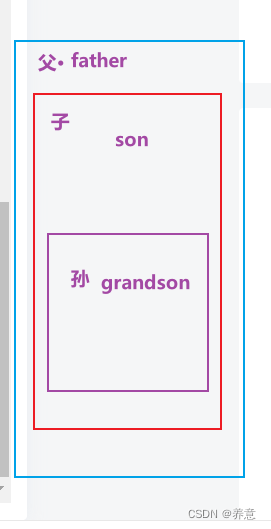
# 组件通信 $attrs(祖孙)
现在有这么个关系的组件
第一父传子
1 2 3 4 5 6 7 8 9 10 father son :a='1' :b='2' v-bind='{c:1,d:2,e:5}' :grandFather='grandFather' function grandFather (val ){cl (val)}
子传孙子:自己没有用的都给了孙
1 2 3 4 5 6 7 8 9 son son里没有用一个参数,如果传的是abc 这里defineProps用了a$attrs里就只剩下bc了 grandson v-bind='$attrs'
在 grandson 里面接收值
1 defineProps (['a' ,'b' ,'c' ,'d' ,'e' ,'grandFather' ])
触发事件传值过去
1 2 3 4 5 6 7 8 9 10 11 <template> <div > <h6 > {{ a }}{{ b }} {{ c }}</h6 > <button @click ="grandFather(1)" > 传给father</button > </div > </template> <script lang ="ts" setup name ="GrandSon" > defineProps (['a' , 'b' , 'c' , 'grandFather' ])</script >
# refs 和 parent
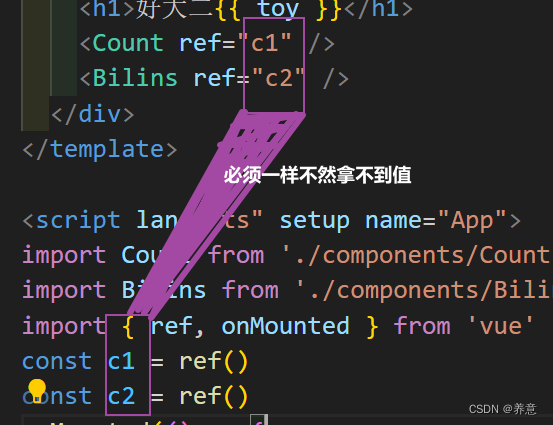
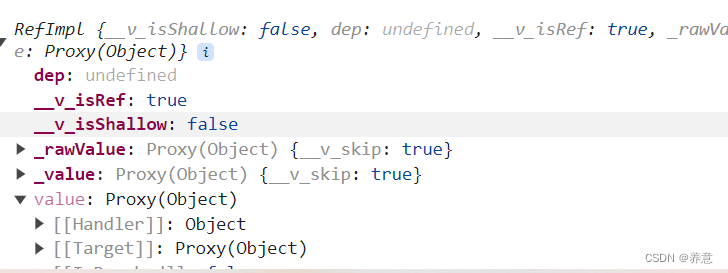
refs 统一收集有 ref 的组件,可以处理对象通过 defineExpose 的值
1 2 3 4 5 6 7 8 9 10 11 12 13 14 15 16 17 18 19 20 21 22 23 24 25 26 27 28 <template> <div class="count"> <h1>好大二{{ toy }}</h1> <Count ref="c1" /> <Bilins ref="c2" /> <button @click="grandFather($refs)">refs</button> </div> </template> <script lang="ts" setup name="App"> import Count from './components/Count.vue' import Bilins from './components/Bilins.vue' import { ref, onMounted } from 'vue' const c1 = ref() const c2 = ref() // onMounted(() => { // console.log(c1.value, c2.value) // }) let toy = ref('奥特曼') function grandFather(value: object) { console.log(value) } </script> <style scoped> .count { color: rgb(20, 109, 187); } </style>
# parent在父组件向外暴露可以给子组件使用的参数
子组件操作父组件的值
1 2 3 4 <button @click="dejsck($parent)" >操作</button> function dejsck (val: any ) { val.toy = 'GGBon' }
ref 包裹的对象里面并不用.value, 只有最顶层的对象需要使用.value
1 2 3 4 5 6 7 const obj=ref ({a :ref (5 )n :ref (5 )k :ref (5 )}) obj.value .n
# provide **&**inject (祖 - 后代通信) 发送
接收
1 2 3 let toy = inject ('toy' , '默认值' )let toy1 = inject ('toy1' , { a : 'morenzhi' })let toy2 = inject ('toy2' , 1 )
方法发送
1 2 3 4 5 provide ('changeToy' , { toy2, changeToy }) function changeToy (val: string ) { toy2.value += val }
传值修改
1 2 let { toy2, changeToy } = inject ('changeToy' ) <button @click="changeToy('ro')" >changeToy</button>
设置默认值
1 2 3 4 5 6 let { toy2, changeToy } = inject ('changeToy' , { toy2 : '动画片' , changeToy : (n: any ) => { console .log (n) } })
# 插槽 slot默认插槽:在子组件中用 slot 标签占位,父组件中子组件中间内容区域的内容会被添加到 slot 指定位置
# 具名插槽 带有名字的插槽使用的时候用模板标签 template 包裹在上面匹配插槽的名字就可以
1 2 3 4 5 6 7 8 9 10 11 12 父 <Count> <template v-slot:bottom> <div>下</div> </template> <template v-slot:top> <div>上</div> </template> <template v-slot:middle> <div>中</div> </template> </Count>
1 2 3 4 子 <slot name="top"></slot> <slot name="middle"></slot> <slot name="bottom"></slot>
简便写法 v-slot 可以简写成#
1 2 3 4 5 6 父 <Count > <template #bottom > <div > 下</div > </template > </Count >
# 作用域插槽 :子组件维护数据,父组件决定展示结构在封装属性时为预留的插槽自定义属性值可以在父组件中用到传过来的值,就是作用域插槽
子组件中有一个数组对象 carList 但是要求用三种不同方式展示
默认作用域插槽和具名作用域插槽
1 2 3 4 5 6 7 8 9 10 11 12 <Count> <template #middle="obj"> <div v-for="item in obj"> {{ item }} </div> </template> </Count> <hr /> <Count v-slot="obj"> <h1>默认作用域插槽</h1> {{ obj }} </Count>
其他 APIperson.value.name ), 只能处理到 person.value 这一层的响应式
shallowReactive 也是只处理第一层的响应式也就是第二个点之前的对象都能处理
值得注意的是如果其他深层次的对象在触发响应式对象之前触发的,在响应式对象触发时也会跟着更新到页面展示上
readonly 和 shallowReadonly(保护原始数据)
shallowReadonly 只把一个属性第一层变成只读的
toRaw 和 markRaw
markRaw 标记一个对象让他永远都不会变成响应式的
customRef 自定义 ref
track () 跟踪 // 告诉 vuemsg 很重要,要持续关注,发生变化就去更新
trigger () 触发 // 通知 vue 数据变化了
1 2 3 4 5 6 7 8 9 10 11 12 13 14 15 16 17 let carList = 'nihao' let msg = customRef ((track, trigger ) => { return { get ( track () return carList }, set (value ) { carList = value trigger () } } })
hooks
1 2 3 4 5 import useMsgRef from '../useCustomRef' let carList = 'nihao' let { msg } = useMsgRef (carList)
Teleport 给它罩着的东西换个 father
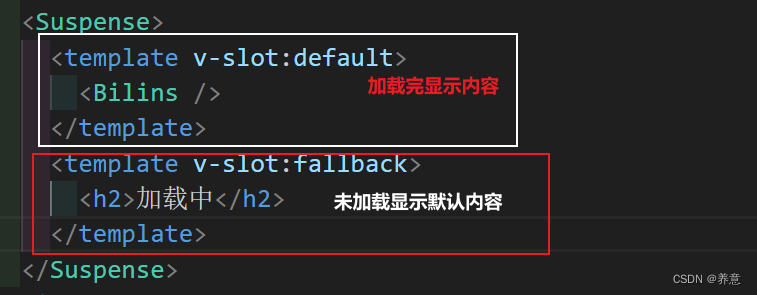
Suspense(实验性功能)
当异步任务没有写在方法里面使用 await 的时候,没办法写 async 的时候可以请求到数据,但是子组件受到异步任务的影响导致子组件被堵塞没有显示在页面上
使用 Supense 标签包裹即可解决
1 import {Suspense } from 'vue'
需要使用 template 模板标签包裹,并且组件内容放在默认插槽,默认显示内容放在 fallback 插槽
# 全局 API 转移到应用对象# Vue2 和 Vue3# 1. 组件注册Vue.component('hellow',hellow) 注册全局组件 app.component('hellow',hellow)
# 2. 全局配置对象,原型链Vue2
1 2 3 4 5 6 const vm = new Vue ({render : (h ) => h (App )}).$mount('#app' )
Vue3
1 2 3 4 5 6 7 引入main.ts declare module 'vue' { interface componentCustomProperties{ x :number,$http :type of axios } }
# 3. 注册全局指令,一般都封装在 HooksVue2
1 2 3 4 5 6 7 8 9 10 11 12 13 14 15 16 17 18 19 20 21 22 23 24 25 26 27 28 Vue.directive('color', { bind (el, binding) { el.style.color = binding.value } , update (el, binding) { el.style.color = binding.value } } )Vue.directive('color', function (el, binding) { el.style.color = binding.value } )局部 directives: { Capital: { inserted(el) { console.log(el, '-----inserted') } , bind(el, binding, vnode, oldVnode) { console.log(el, binding, vnode, oldVnode, '-----bind') } , update(el, binding, vnode, oldVnode) { console.log(el, binding, vnode, oldVnode, '-----update') } }
vue3
1 2 3 4 5 6 7 8 9 10 11 12 13 14 app.directive ('beauty' ,(ele )=> { ele.style .color ='red' ........... }) 局部 const focus = {mounted : (el ) => el.focus ()} export default {directives : {focus } }
# 4. 卸载组件Vue2
# 5. 安装插件# Vue3 总结与 vue2 不一样的地方尽在 vue3 迁移指南 Vue 3 迁移指南


 这样写模板太臃肿